Library claiming is currently only available for GitHub repositories.
Why Claim Your Library?
Claiming ownership provides several benefits:- Web-based configuration: Edit settings through a user-friendly interface instead of committing changes
- Team management: All project members can manage the library configuration
- Version management: Add and manage multiple versions of your library documentation
- Usage analytics: View metrics on how developers use your library’s documentation
- Higher refresh limits: Get higher rate limits for refresh operations to better manage your content
Claiming Process
1
Navigate to the Admin Page
You can access the admin page in two ways:From the Dashboard:
Find your library in the dashboard and click the “Manage” button to open the admin configuration page.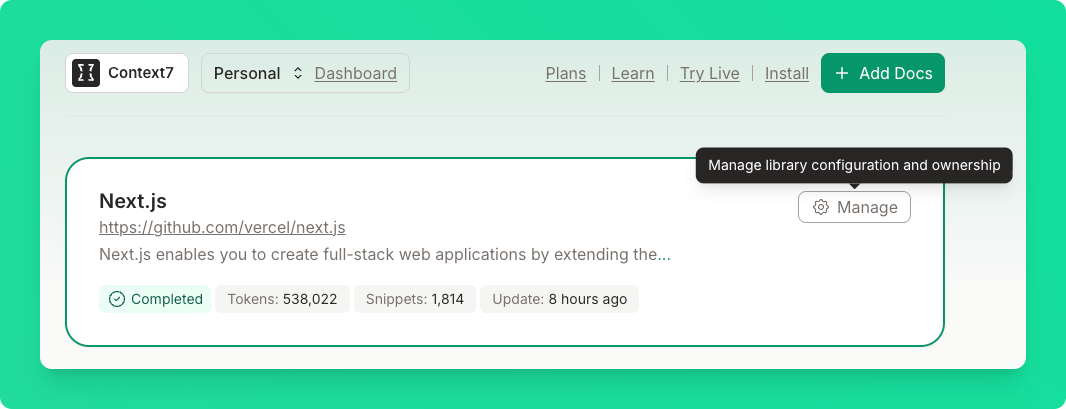
https://context7.com/vercel/next.js/admin2
Open the Claim Modal
If you haven’t claimed the library yet, you’ll see a “Claim Library” button in the header. Click it to open the claiming modal.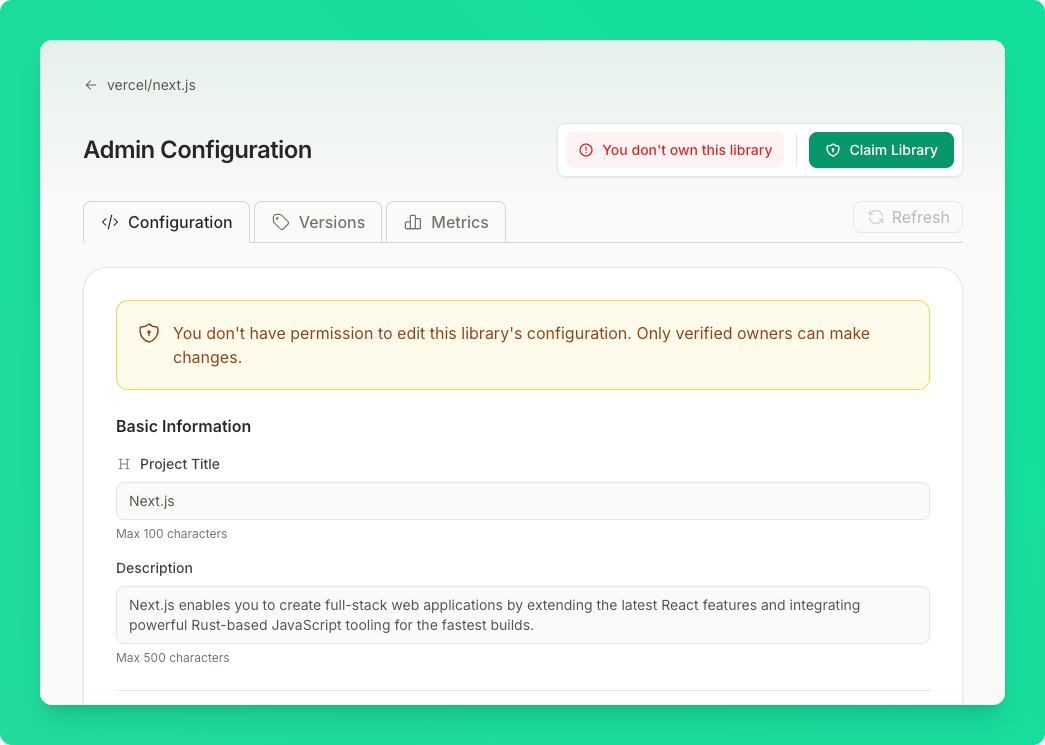
3
Get Your Public Key
In the claiming modal, you’ll see a generated 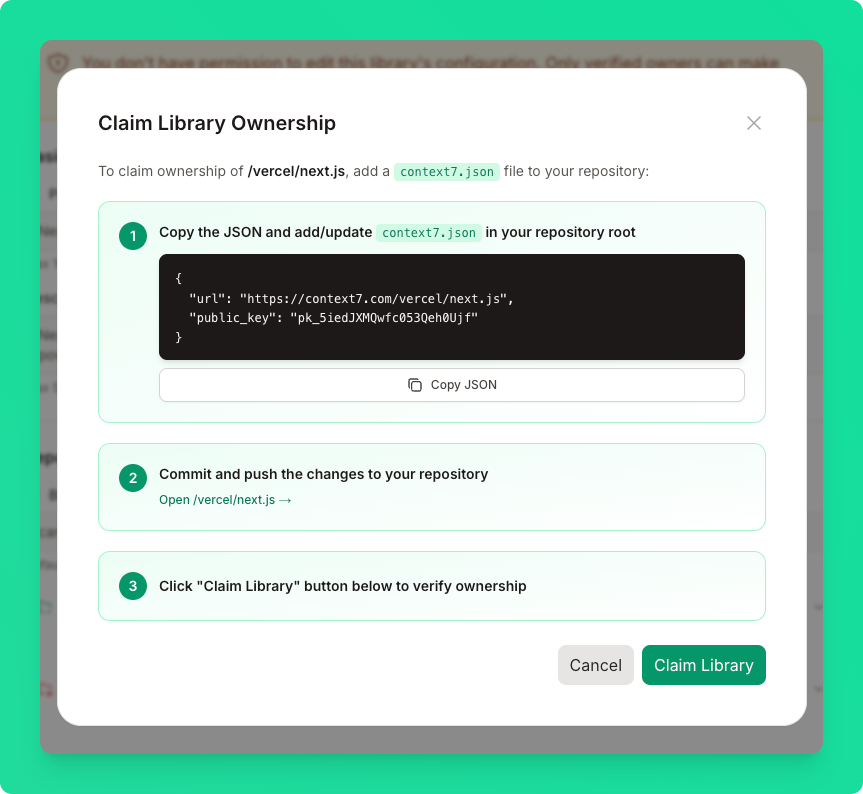
context7.json configuration with your unique public key:4
Add context7.json to Your Repository
Create a Commit and push the file to your repository’s default branch.
context7.json file in the root of your repository with the copied content:5
Verify Ownership
Return to the claiming modal and click “Claim Library”. Context7 will:
- Fetch
context7.jsonfrom your repository - Verify the URL matches your library
- Verify the public key matches your project
For private repositories, ensure you have the Context7 GitHub App installed with access to the repository.
Admin Panel Overview
After claiming your library, the admin page shows a full configuration editor with three main tabs:- Configuration: Edit all library settings
- Versions: Manage previous versions of your library
- Metrics: View usage statistics
Configuration Fields
Basic Information
| Field | Description | Limits |
|---|---|---|
| Project Title | Display name for your library in Context7. Used when the LLM cannot generate a name with high confidence. | Max 100 characters |
| Description | Brief description of your library’s purpose. | Max 500 characters |
Repository Settings
| Field | Description | Limits |
|---|---|---|
| Branch | Git branch to parse. Leave empty for default branch. | Max 100 characters |
| Folders to Include | Specific folder paths to include when parsing. Leave empty to scan the entire repository. | Max 50 folders, 255 chars each |
| Folders to Exclude | Folder paths or patterns to exclude from parsing. Supports glob patterns. | Max 50 patterns, 255 chars each |
| Files to Exclude | Specific file names to exclude (filename only, not full path). | Max 100 files, 255 chars each |
Exclusion Pattern Examples
The exclusion fields support various pattern types:excludeFiles only accepts filenames, not paths. Use CHANGELOG.md instead of
docs/CHANGELOG.md.LLM Configuration
| Field | Description | Limits |
|---|---|---|
| Custom Rules | Best practices and guidelines for AI coding assistants when using your library. | Max 50 rules, 255 chars each |
- “Always use TypeScript for better type safety”
- “Import components from the main package, not internal paths”
- “Use environment variables for API keys, never hardcode them”
Advanced Settings
| Field | Description | Limits |
|---|---|---|
| Redirect URL | Redirect users to a different library. Leave empty to disable. | Max 500 characters |
| Disallow Indexing | Opt-out from Context7. When enabled, documentation content is removed and the library becomes inaccessible. | Boolean |
Managing Versions
The Versions tab lets you configure previous versions of your library that should be available in Context7.
- Git tags: Reference a specific release tag (e.g.,
v1.2.0) - Git branches: Reference a branch for version-specific documentation (e.g.,
release-1.x)
| Limit | Value |
|---|---|
| Maximum versions | 20 |
| Tag/branch name | Max 50 characters |
Library Metrics
The Metrics tab provides insights into how developers are using your library through Context7.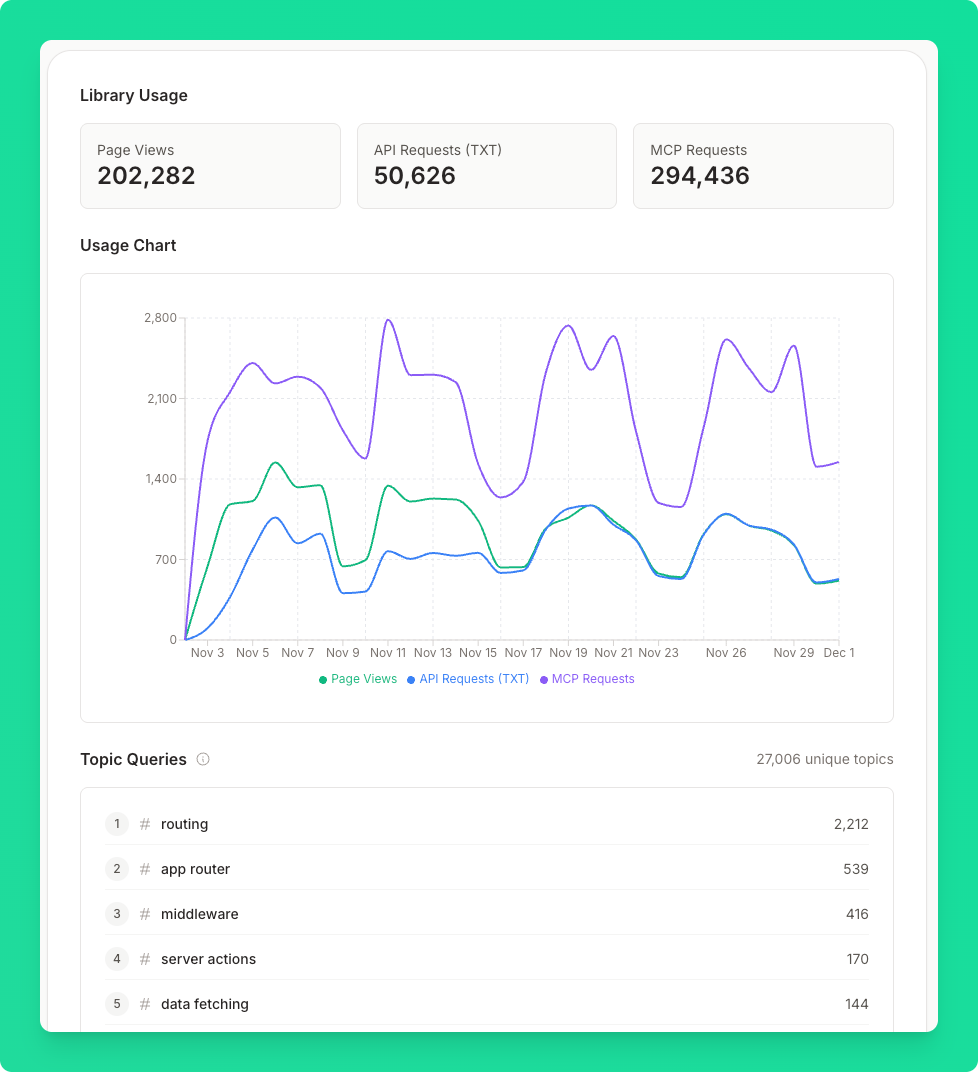
Usage Statistics
At the top of the metrics page, you’ll see key usage numbers:| Metric | Description |
|---|---|
| Page Views | Number of times your library page was viewed on Context7 |
| API Requests (TXT) | Documentation requests via the REST API |
| MCP Requests | Documentation requests via the MCP server (from AI coding assistants) |
Usage Chart
A time-series chart shows your library’s usage over the past days, with separate lines for each metric type. This helps you identify trends and see how adoption changes over time.Topic Queries
See what developers are asking about when they query your library’s documentation. This table shows:- The specific topics and keywords in queries
- How many times each topic combination was requested
Country Distribution
View the geographic distribution of requests to your library, showing the country name and number of requests from each country. This helps you understand your global user base and can inform decisions about localization or regional documentation needs.Team Access
Library ownership is project-based, meaning all members of your Context7 project can:- View the admin configuration
- Edit and save changes
- Manage versions
Removing Ownership
1
Go to the Admin Page
Navigate to your library’s admin page at
https://context7.com/admin/{owner}/{repo}.2
Open the Ownership Menu
Click the ownership menu in the header area.
3
Remove Ownership
Select “Remove Ownership” and confirm the action.
Troubleshooting
”context7.json not found”
Ensure the file is:- Named exactly
context7.json(lowercase) - Located in the repository root, not a subdirectory
- Committed and pushed to the default branch
”URL mismatch”
Theurl field in your context7.json must exactly match:
”Public key mismatch”
Thepublic_key in your file must match the key shown in the claiming modal. Copy the entire key including the pk_ prefix.
”Access denied to repository”
For private repositories, install the Context7 GitHub App with access to your repository.Changes not appearing
After saving configuration changes, you may need to:- Manually trigger a refresh from the library page
- Clear any cached documentation on your end
Need Help?
If you encounter issues claiming your library or configuring settings, please:- Check the troubleshooting guide
- Open an issue
- Reach out on Discord